How to Add Auto AI Captions to Video Free (Step-by-Step Guide)
Learn how to add auto AI captions to your video for free. Follow simple steps, fix common caption mistakes, and compare free tools like Auto Seedance, CapCut and YouTube.

Umer Khan has spent the last two years building and testing AI-assisted content workflows for YouTube, from scripting to 2D animation. He writes about what actually works in AI video production including the parts that don't.
You can add auto AI captions to a video for free in about five minutes. Upload the video, let AI turn the speech into text, fix any mistakes, pick a caption style, and export. That is the whole process.
In this guide, we will do it step by step with the free AI Auto Captions Generator on Auto Seedance. Then we will look at other free tools like CapCut, YouTube Studio, VEED, Kapwing and Clipchamp, so you can pick the one that fits your work. We will also cover the two things that annoy people most: watermarks and wrong captions.
Quick answer: the fastest way to add auto captions free
- Open the Auto Seedance AI Auto Captions Generator.
- Upload your video (MP4, MOV or WebM, up to 500 MB).
- Choose the spoken language and click Generate auto captions.
- Edit the transcript, choose a caption style, and check the 9:16 preview.
- Export the captioned MP4, or download the SRT file.
That is the short version. Now let us go through each step so you do not get stuck.
How to add AI captions with Auto Seedance (step by step)
Auto Seedance recently added a free captions tool. According to the tool page, it uses Whisper AI to turn speech into text and FFmpeg to render the final MP4. The page also says it does not use paid caption API credits. You will need to sign in or start a free account to use it.
Step 1: Upload your video
Drag your video into the upload box or click to browse. The tool accepts MP4, MOV and WebM files up to 500 MB. If your file is bigger, compress it first or cut it into shorter parts.
One thing to know: the page says your video is uploaded to a captions worker for transcription and rendering. So the video does leave your phone or computer. If your video is private or confidential, keep that in mind.
Step 2: Choose the spoken language
Select the language that is actually spoken in the video. This matters more than people think. If the language setting is wrong, the AI will guess badly and the captions will be full of errors. The tool page describes the speech recognition as multilingual, but it does not list exact languages or accuracy. So if you speak a less common language or mix two languages in one video, test a short 15-second clip first.
Step 3: Generate the captions
Click Generate auto captions. The AI listens to the audio and creates timed text. Longer videos take more time to process.
Step 4: Edit the transcript
Do not skip this step. No AI is perfect. Read through the captions while the video plays and fix:
- names of people, brands and places
- numbers, prices and dates
- technical words
- places where background music or noise confused the AI
Five minutes of editing is the difference between captions that look professional and captions that look careless.
Step 5: Pick a caption style and check the preview
The tool offers 60 caption templates, with names like Neon Glow, Clean Minimal, Highlight Brush, Sticker Style and Gradient Modern. A live 9:16 preview shows how the text will look on a vertical video such as a Reel, TikTok or YouTube Short.
A simple rule for choosing a style: the caption must be easy to read first and good-looking second. If you are unsure, start with a clean style and strong contrast between the text and the background.
Step 6: Export your video or SRT file
You have two choices:
- Captioned MP4: the captions are burned into the video. Best for Reels, TikTok and Shorts, where you want the style to look the same everywhere.
- SRT file: a separate subtitle file. Best for YouTube or any platform that lets you upload subtitles, and useful if you want to edit them later.
Why captions are worth the extra five minutes
Captions do two jobs. They let people follow your video when they cannot or do not want to play the sound, and they help people understand faster when the sound is on. Deaf and hard-of-hearing viewers and people watching in a second language also depend on them.
Here is what the available studies say. Keep in mind that most of these are marketing studies, many are from 2019 or earlier, and several are about video ads or Facebook, not about every video on every platform.
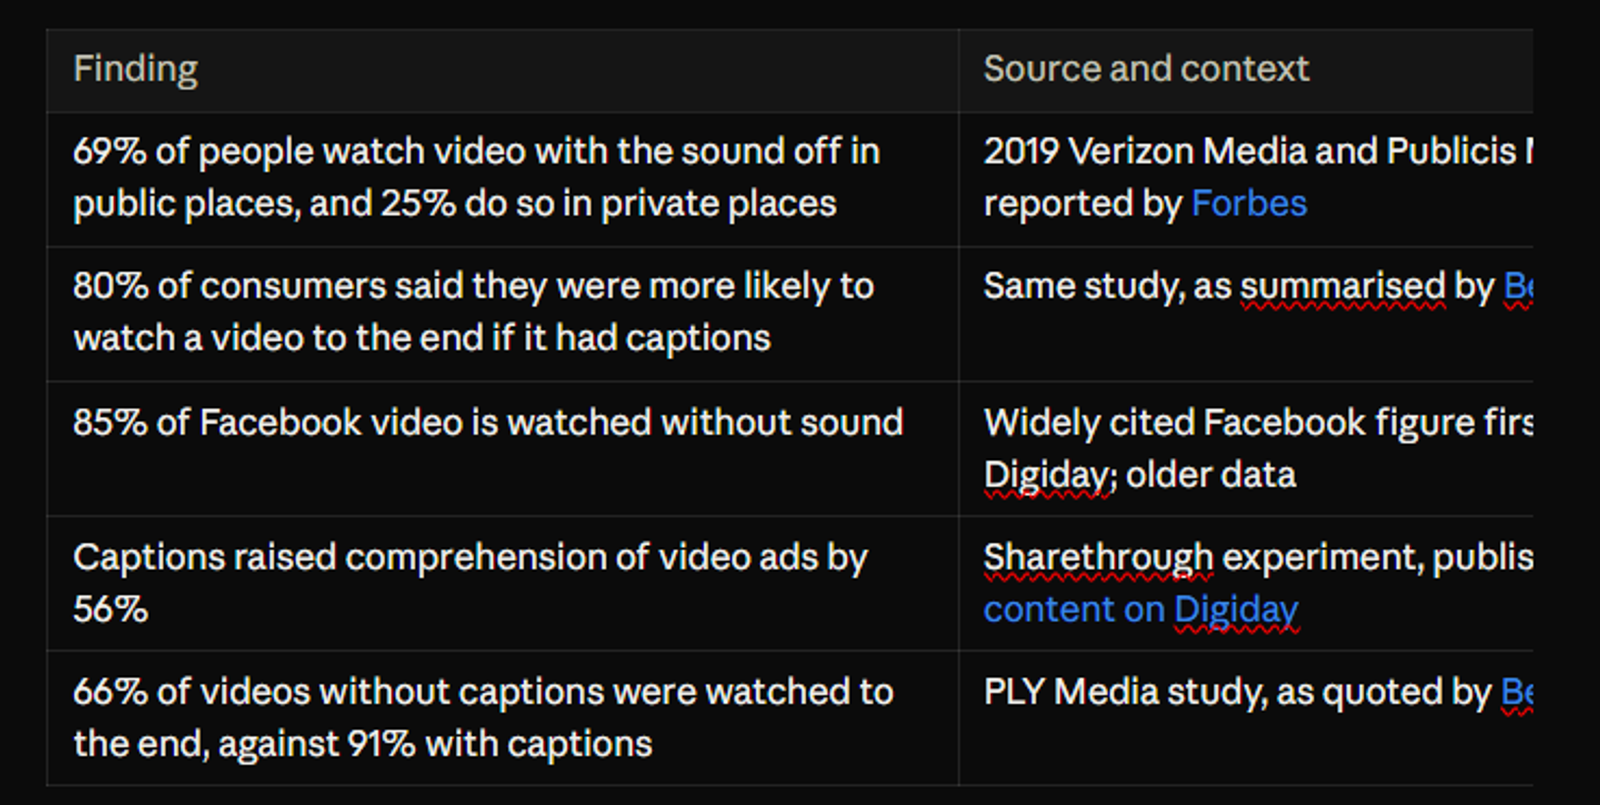
Some newer blog posts quote bigger numbers, such as 92% of people watching on mute. I could not trace those back to a clear original study, so they are not used here.
The honest conclusion is not "captions guarantee more views." It is smaller and more useful: a lot of people watch with the sound off, so a video that only makes sense with sound loses those viewers in the first few seconds. Captions fix that, and the fix costs you very little.
Get better captions before you upload
The AI can only transcribe what it can hear. Research on speech recognition notes that audio quality and noise affect error rates, and one creator-focused guide says names, brands and numbers are where auto-captions most often go wrong (Techsy). So a little preparation saves a lot of editing. This is practical guidance, not a tested result:
- Record in a quiet room. Fans, traffic and echo all make the AI guess.
- Keep music lower than your voice. If the music is loud, the AI may mishear words or add captions where nobody is speaking.
- Speak at a steady pace. Fast, mumbled speech is the hardest for any speech recognition system.
- Avoid people talking over each other. Overlapping voices often end up as jumbled text.
- Say names and brand words clearly, and plan to check their spelling afterwards.
- Choose the correct spoken language before you generate anything.
- Keep the file under the upload limit. For the Auto Seedance tool that is 500 MB.
How accurate are AI captions? What to expect
The Auto Seedance page says the tool uses Whisper, an open speech recognition model from OpenAI. The Whisper project documentation says it supports 99 languages, including Urdu (Whisper language docs). It also says performance varies widely by language, and that less common languages can have higher error rates.
That last point matters if you speak a language other than English. A 2024 research paper on Urdu speech recognition describes Urdu as a low-resource language, meaning there is much less training data than for English, with gaps in accuracy and reliability (WER We Stand, arXiv). A 2025 workshop paper that tested Whisper on Pashto, Punjabi and Urdu found that fine-tuning the model reduced its error rate significantly. In plain words: the default model is useful, but there is room for mistakes, so always review the text.
A few other things to know:
- The Auto Seedance page does not say which Whisper model size it uses, and it does not publish an accuracy number. This article does not claim one either.
- Some tool-maker blogs claim 96 to 98% word accuracy on clean audio with standard accents, and say names and similar terms are wrong 15 to 25% of the time. These come from companies selling caption tools, not from independent tests, so treat them as rough guesses.
- If you mix languages in one video, for example Urdu and English, test first. The tool page does not say how mixed-language speech or Roman Urdu spelling is handled.
A 2-minute accuracy test you can do yourself
Before you caption a long video, generate captions for a clip of about 20 seconds and count the mistakes.
- Count the total words spoken in the clip.
- Count how many words are wrong, missing or added.
- Divide the wrong words by the total, then multiply by 100.
Example: if the clip has 50 words and 5 are wrong, that is 5 ÷ 50 × 100 = 10% errors. This example is only to show the maths, not a result for any tool.
If a 20-second test needs heavy fixing, try improving the audio first, or try another tool from the list below with the same clip. Using the same clip for every tool gives you a fair comparison.
Why your captions look wrong (and how to fix them)
Most bad captions come from a few simple causes.
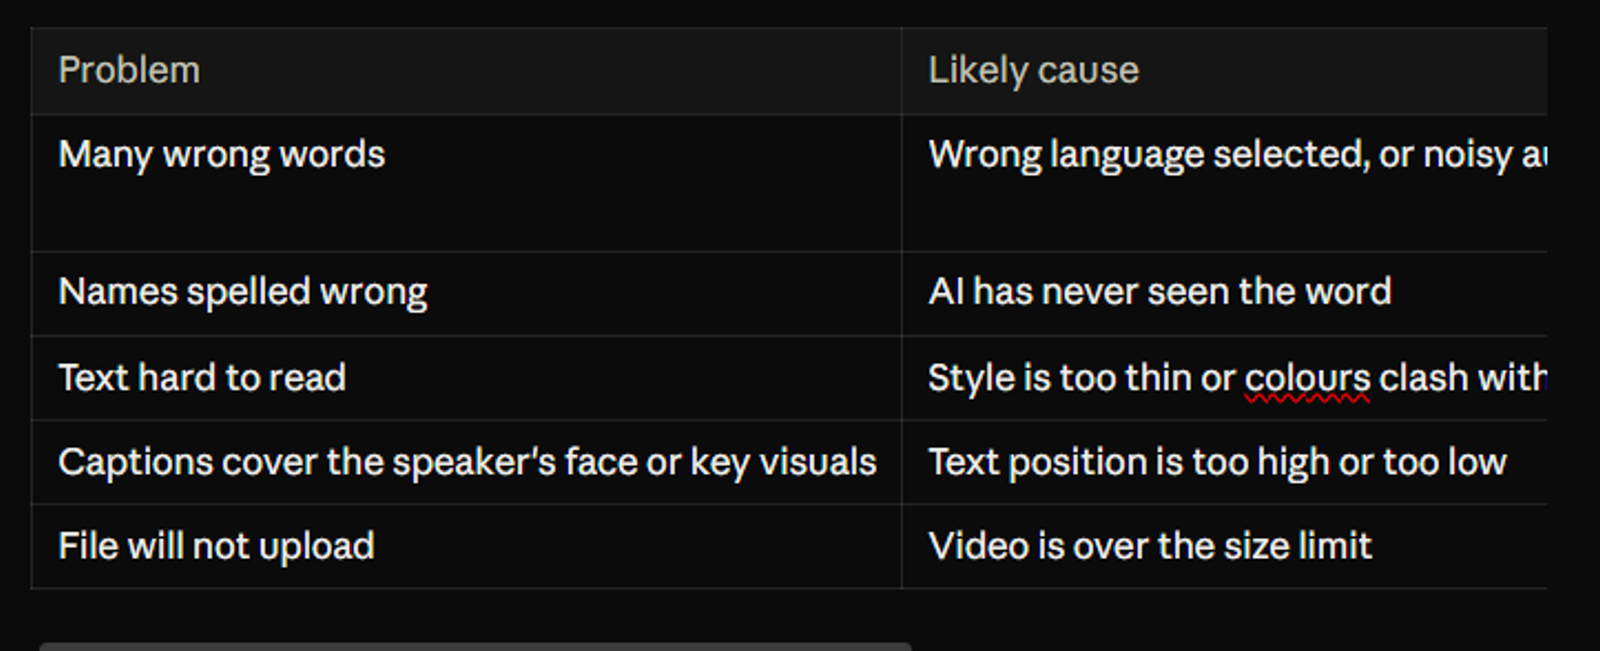
Two more choices are down to taste and your audience:
- Word-by-word or full lines? Tool-maker blogs say animated word-by-word captions are popular for short-form video, and that clean, minimal captions suit educational content (ClipSpeed). That is the view of companies that sell caption tools, not a rule. A simple way to decide: fast, energetic video can handle punchy highlighted words, while teaching or explaining content is easier to follow in short, steady lines.
- Which style from the 60 templates? Pick readability first. Strong contrast with the background matters more than a fancy effect. Then use the same style across your videos, so your account looks consistent. Use the 9:16 preview to check that the text does not sit under app buttons or over the speaker's face before you export.
Burned-in captions vs SRT files
These are the two ways captions can travel with your video, and picking the right one saves trouble later.
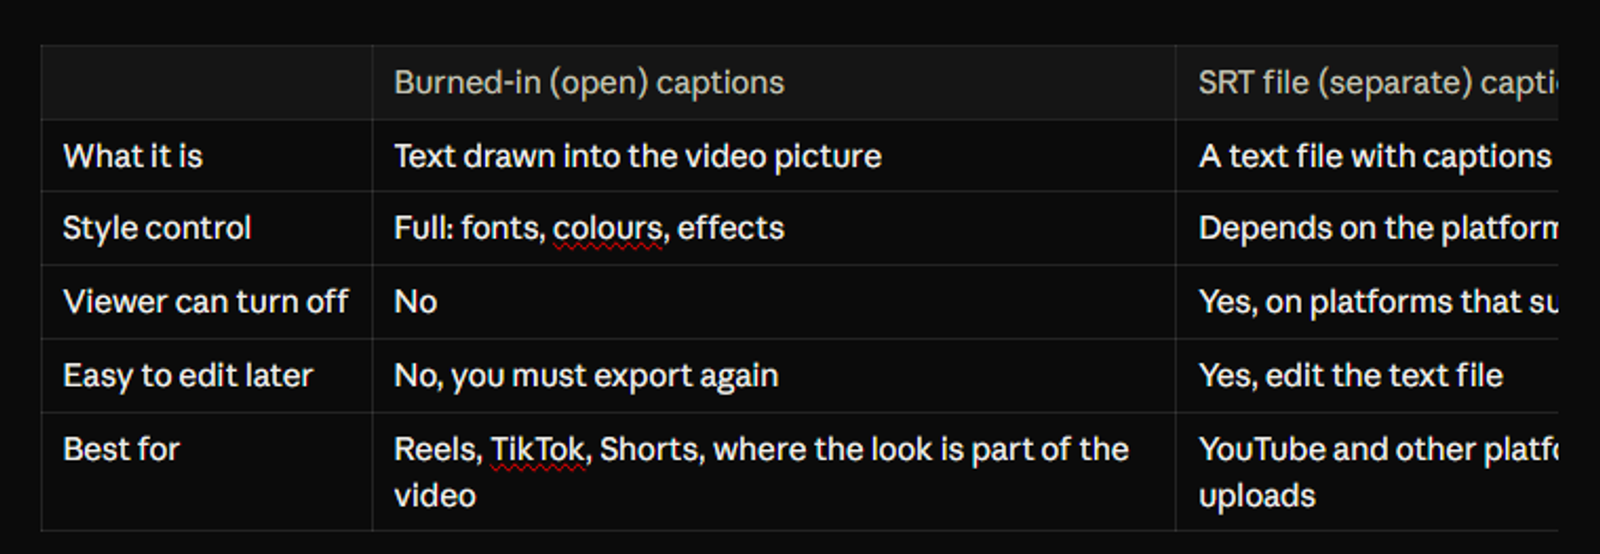
An SRT file is simple plain text. Each caption has a number, a start and end time, and the words. It looks like this (an illustrative example, not output from any tool):
1
00:00:00,000 --> 00:00:02,400
Welcome to the channel.
2
00:00:02,400 --> 00:00:05,100
Today we add captions for free.
The Auto Seedance tool gives you both: a captioned MP4 and an SRT download. A sensible habit is to keep the SRT even when you post the burned-in version. You can reuse it later for YouTube, for translation, or for a blog post transcript.
One thing worth checking: if you post a burned-in video to a platform that also shows its own auto-captions, two sets of text can appear on screen at once. Test one upload and look at it on a phone before you post at scale.
Should you use the app's own captions instead?
Instagram, TikTok and YouTube all have built-in caption features, so why use a separate tool at all? Here is what the sources say:
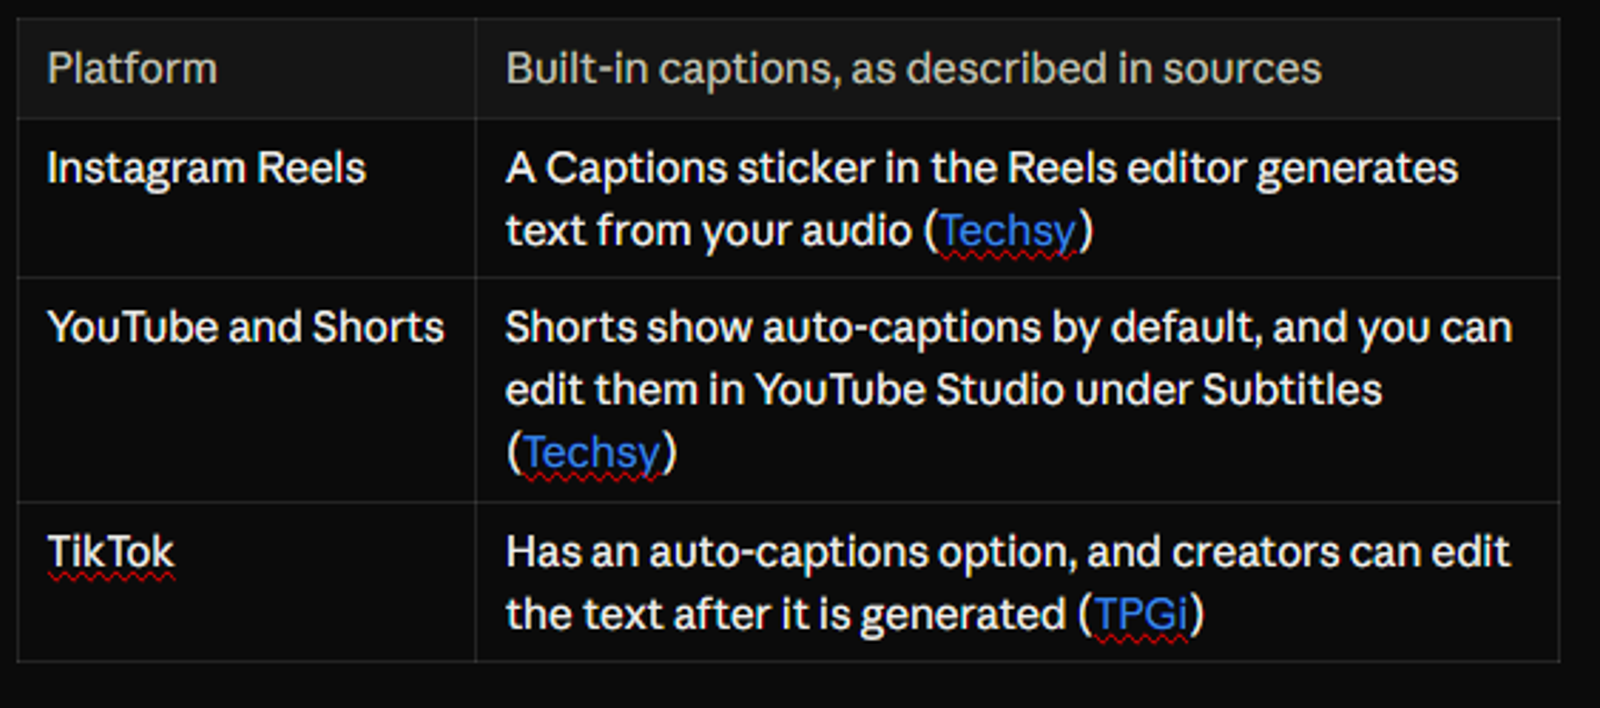
These are free, fast and good enough for many videos. The trade-off, according to caption-tool vendors, is that platform captions are basic accessibility captions with limited styling, and every creator has the same options (ClipSpeed). Features also change from app to app and from country to country, so check the current version of each app.
A practical way to choose: if you only need readable captions on one platform, use that platform's own feature. If you want one consistent look across Instagram, TikTok and YouTube, generate and style the captions once in a separate tool, export the MP4, and upload the same file everywhere.
Other free tools to add auto captions
Auto Seedance is not the only option, and it is not the right one for every situation. Here are other popular free choices. Free plans change often, and different review sites report different limits, so always check the current plan before you commit to a big project.
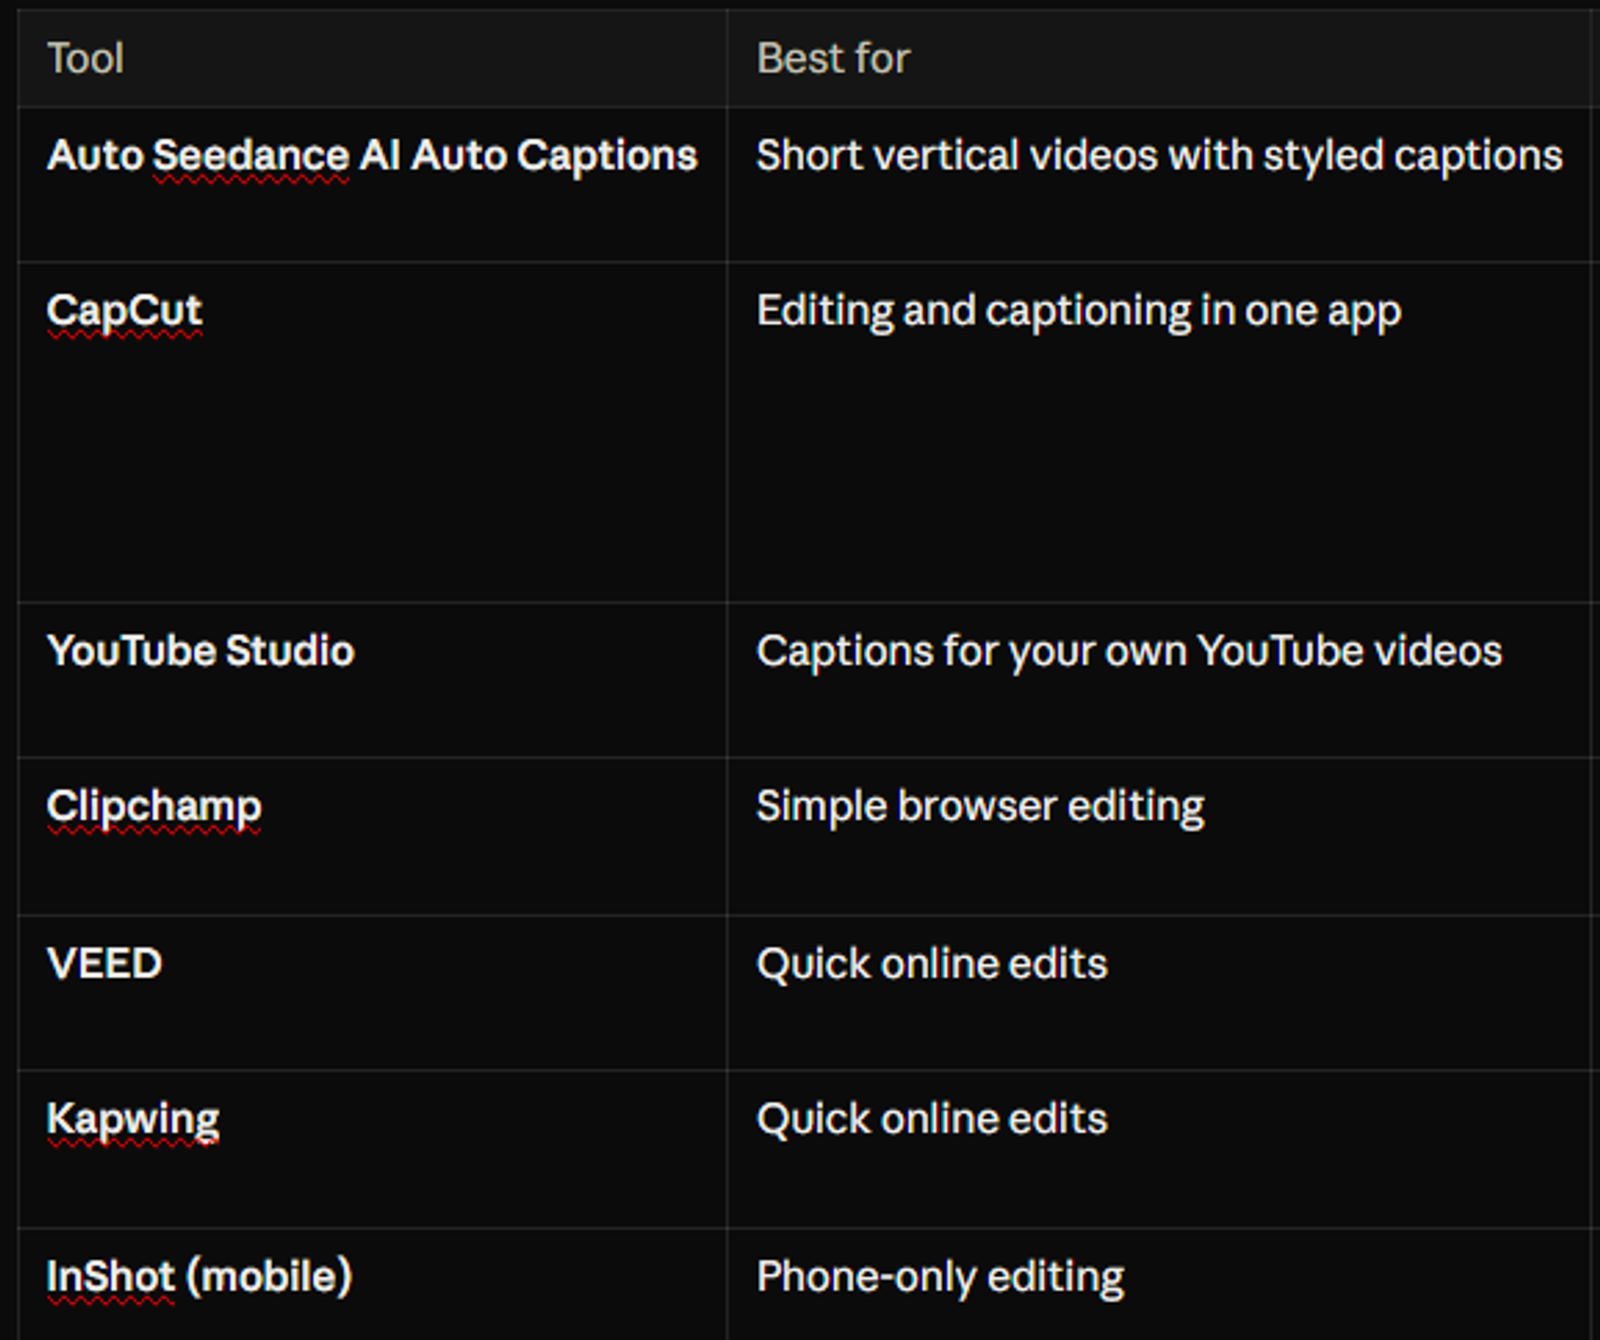
Notice the pattern. Tools built mainly as full video editors often add limits or watermarks to free plans. Tools that focus on one job, like captions, can be simpler, but each has its own limits.
Which tool should you choose?
Do not look for "the best tool." Look for the best tool for what you are doing.
- You make Reels, TikToks or Shorts and want stylish captions fast: try the Auto Seedance captions tool or CapCut.
- You already edit everything in CapCut: stay in CapCut and use its auto captions, so you do not have to move files between apps.
- You upload long videos to YouTube: use YouTube Studio's auto captions, then edit them.
- You want a clean, simple free editor in your browser: try Clipchamp.
- You need a quick one-off edit and do not mind a watermark: VEED or Kapwing can work, but check the limits first.
- You are working on a phone only: CapCut or InShot are the practical choices.
If watermarks are your biggest worry, test your export with a very short clip before spending an hour on a full video.
A simple workflow that saves time
Here is a practical way to combine tools if you make short videos often:
- Finish your video edit first, so the timing is final.
- Generate captions on the finished video, so they do not go out of sync.
- Read the transcript once, then fix names and numbers.
- Choose one caption style and keep using it across your videos so your channel looks consistent.
- Export a captioned MP4 for social media and keep the SRT file for later use.
Final check before you publish
Run through this list once. It takes about two minutes and catches most embarrassing mistakes.
- Watch the whole video once with the sound off. Does it still make sense?
- Check every name, brand, number, date and price against what you meant to say.
- Look for words that were added during music or silence.
- Make sure no caption stays on screen too briefly to read.
- Check that the text does not cover a face, a product or other on-screen text.
- Confirm the text is readable on a small phone screen, not only on your computer.
- Confirm the language and spelling are consistent, especially for names.
- Check that any claims you make in the video are still accurate, since captions make them easy to quote.
- Save the SRT file with the finished video.
Final takeaway
Adding auto AI captions for free is easy. The real work is choosing the right language, fixing the transcript, and picking a style people can read on a small screen. If you want a quick, free way to try it, upload one short video to the Auto Seedance AI Auto Captions Generator, edit the text, and export. If it does not fit your workflow, CapCut, YouTube Studio and Clipchamp are good free alternatives to test.
Test with a short clip first. It takes one minute and tells you more than any review.
Frequently Asked Questions
Can I add captions to a video without a watermark for free?+
Some tools can, but it depends on the tool and the plan. VEED and Kapwing free plans are reported to add watermarks, while YouTube Studio and Clipchamp are reported not to. CapCut reports vary, so test an export before you start a big project.
Do I need to type the captions myself?+
No. AI creates the first version automatically. You only need to read it and fix mistakes.
What is an SRT file?+
An SRT file is a plain text file that holds your captions and the time each one appears. You can upload it to platforms like YouTube, or open it later to edit the text.
Should I burn captions into the video or upload an SRT file?+
Use burned-in captions when you want a specific look on Reels, TikToks or Shorts. Use an SRT file when the platform supports subtitle uploads and you want viewers to be able to turn captions on or off.
Is AI caption accuracy 100% correct?+
No. Always review the captions before publishing, especially names, numbers and any claims in your video.
Can AI captions handle Urdu or other languages?+
Whisper, the model the Auto Seedance page names, supports 99 languages including Urdu, but accuracy varies by language and less common languages tend to have higher error rates. The tool page does not publish accuracy figures or a language list. Test a 20-second clip in your language first, then decide how much editing you will need.
What if my video is larger than 500 MB?+
Compress it, shorten it, or split it into parts and caption each part. Many short videos are well below this limit.
Keep reading
Suggested Related Articles
How to Master AI Filmmaking: A Tool-Agnostic Workflow With Real Costs and Limits
Making one AI clip is easy; making a film is a different skill. This guide covers the tool-agnostic workflow, a first-scene exercise, where it breaks, and what a 10-second scene, a minute, and five minutes cost at current public prices.
The Mother's Monster: How a Pakistani Creator's AI Film Hit 50M Views, and 10 AI Movie Generators to Make Your Own
The Mother's Monster, a 28-minute AI film by Pakistani creator Zahid Iqbal, drew 50M+ views by the studio's count. This guide separates what's confirmed from what isn't, shows what a similar film could cost, and compares 10 AI movie generators to try.
GPT-6 Astra in ChatGPT: Who Actually Gets It, and What Free Users Get Instead
GPT-6 Astra is OpenAI's flagship, but most ChatGPT users run Sol or Luna. This guide explains who gets Astra on each plan, how to find it, what it costs, where OpenAI's own benchmark table shows it trailing, and why older guides are out of date.
Claude Startups Program After the Pause: What's Still Free, What Changed, and How to Apply
Anthropic expanded the Claude Startups program on October 6, then paused its free Team year and $1,000 API credit days later. This guide covers what's still available, who qualifies, what the dollar figures mean, and how to apply, with every claim sourced.